A simple guide for creating your own mods & editing your save file!
Introduction 🌙
First thing you’ll want to do is grab the UndertaleModTool, which works on Fields of Mistria because both games are GameMaker games. You specifically want the Bleeding Edge “IsSingleFile” version, doesn’t matter if it’s the debug version or not.
You’ll want to load your data.win file which is located in the same place that Fields of Mistria is installed on your computer.
This is currently the only tool available for modding that I’m aware of, but this section may be edited later if a better tool exists!
Accessing UndertaleModTool 🔧
First thing you’ll want to do is grab the UndertaleModTool on Github, which works on Fields of Mistria because both games are GameMaker games. You specifically want the Bleeding Edge “IsSingleFile” version, I picked false debug version (if that matters.)

You’ll want to load your data.win file which is located in the same place that Fields of Mistria is installed on your computer. For me, this is located in: C:\Program Files (x86)\Steam\steamapps\common\Fields of Mistria
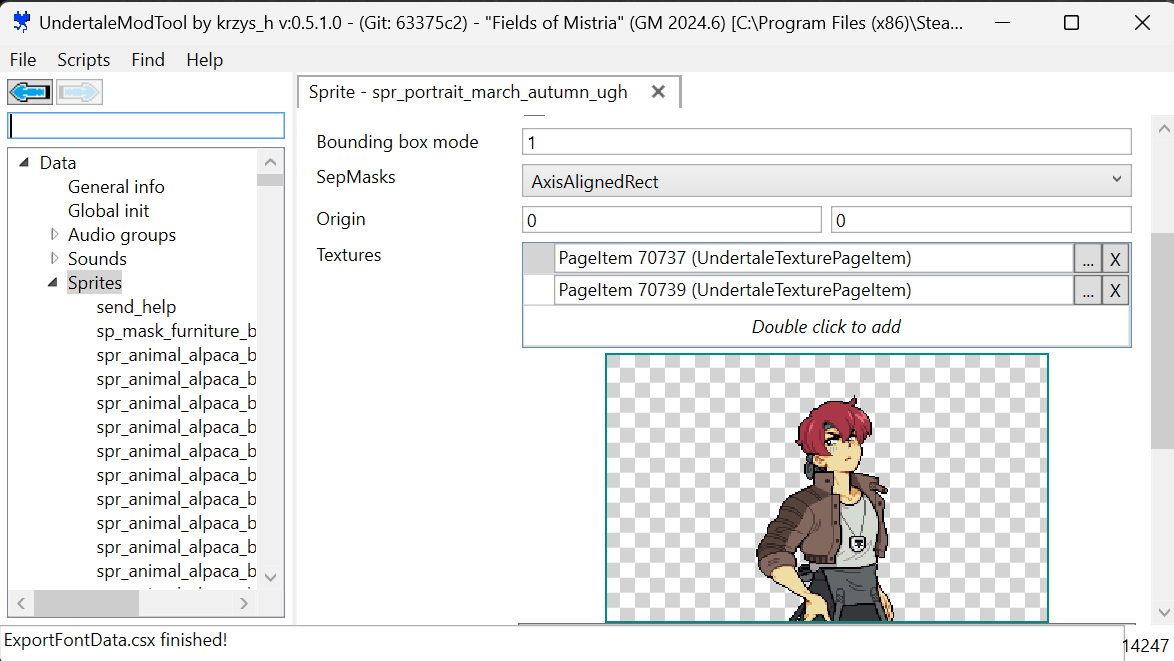
This is currently the only tool available for modding that I’m aware of, but this section may be edited later if a better tool exists!
Exporting Sprites 🌸
For simplicity, you’ll be exporting all in-game sprites (images) for editing. We’ll use a Script already available in the mod tool called ExportAllSprites. You can find it under Scripts > ResourceUnpackers > ExportAllSprites.csx. It will take a moment to load the script, and then it will ask if you want to retain padding (you can click no,) and if you want it in subdirectories (again, hit no.)
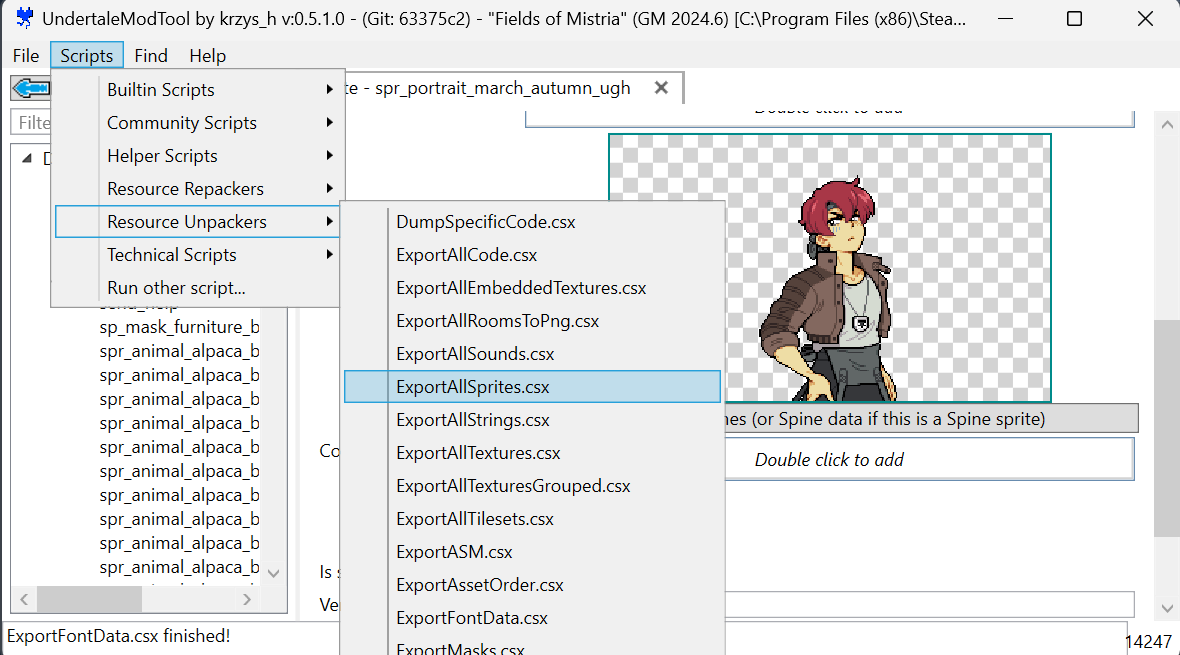
Subdirectories will make a folder for each group of related sprites which makes navigating them more confusing than it needs to be, it’s easier to just throw all sprites in one singular folder for searching purposes.
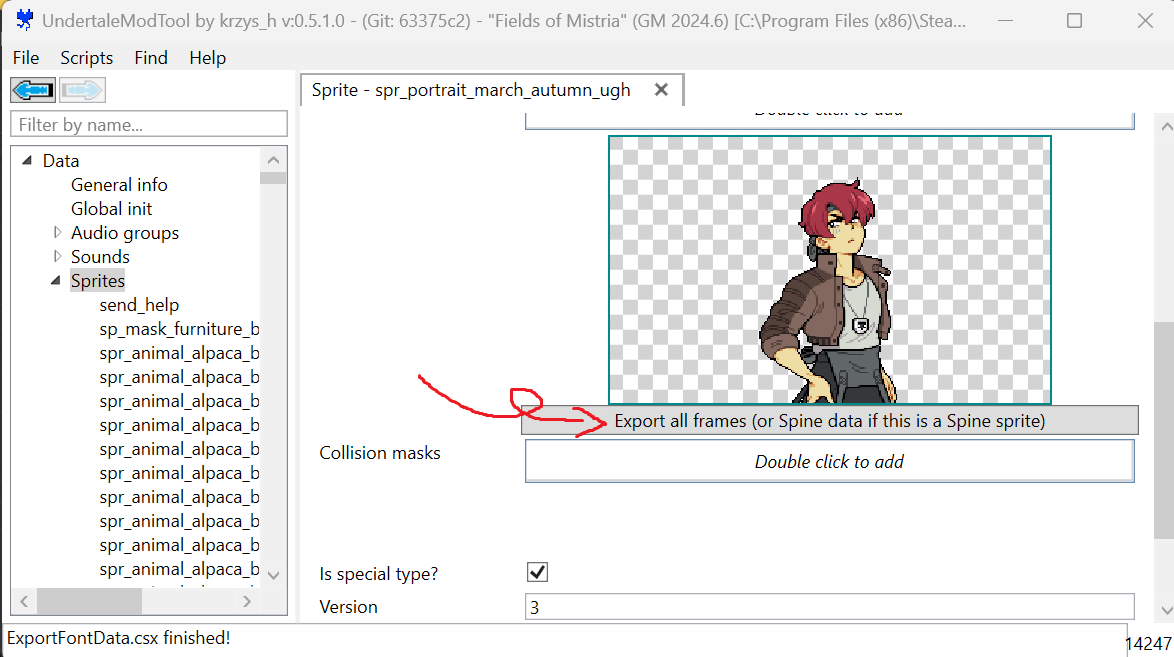
If you specifically only want to export a few sprites rather than thousands of images, you can just search the sprite name by “Filter by name…” and individually click Export all frames but this may take longer if you need to edit many sprites. Most sprites have very obvious names, for example, all March sprites will show up if you just search March.
After you finish exporting all images, typically they will be saved in the same place as your game installation. They will be stored in a folder called Export_Sprites which is right next to your data.win file.
Little tip: If you want to reduce the size of your folder a little bit for searching purposes, you likely will not need any images under the word *shadow* and *highlight* which strictly just put shadows under sprites and add highlight elements to UI.
For this section, I recommend just using whatever software you feel most comfortable with for image editing. For this guide, I’ll be using Aseprite which is wonderful for pixel art specifically. You can compile Aseprite yourself on Github for free if you don’t want to purchase it. Look up guides on YouTube on how to do that if you’re not sure how to compile something!
First thing you’ll want to do is get the sprites you are specifically editing. The mass exporter will export around 20,000 images which is too hard to sort through so you’ll want to grab only specific images you are editing and move them into a new folder. For this guide, I’ll be editing March, so I search my Export_Sprites folder for *March* to drag up all March images. Then I select all the March images and move them into a new folder called “Sprites” on my desktop – I use this name just because I’m not sure if the importer requires the naming scheme to be the same as how they are stored in-game with GameMaker.
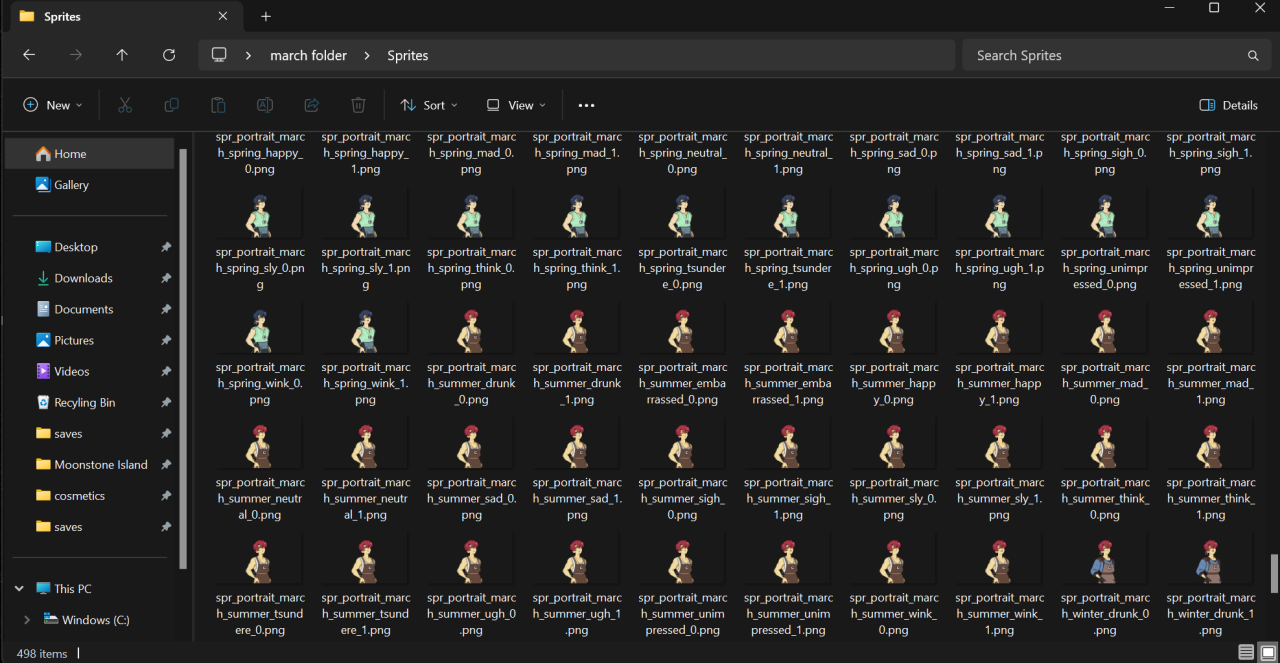
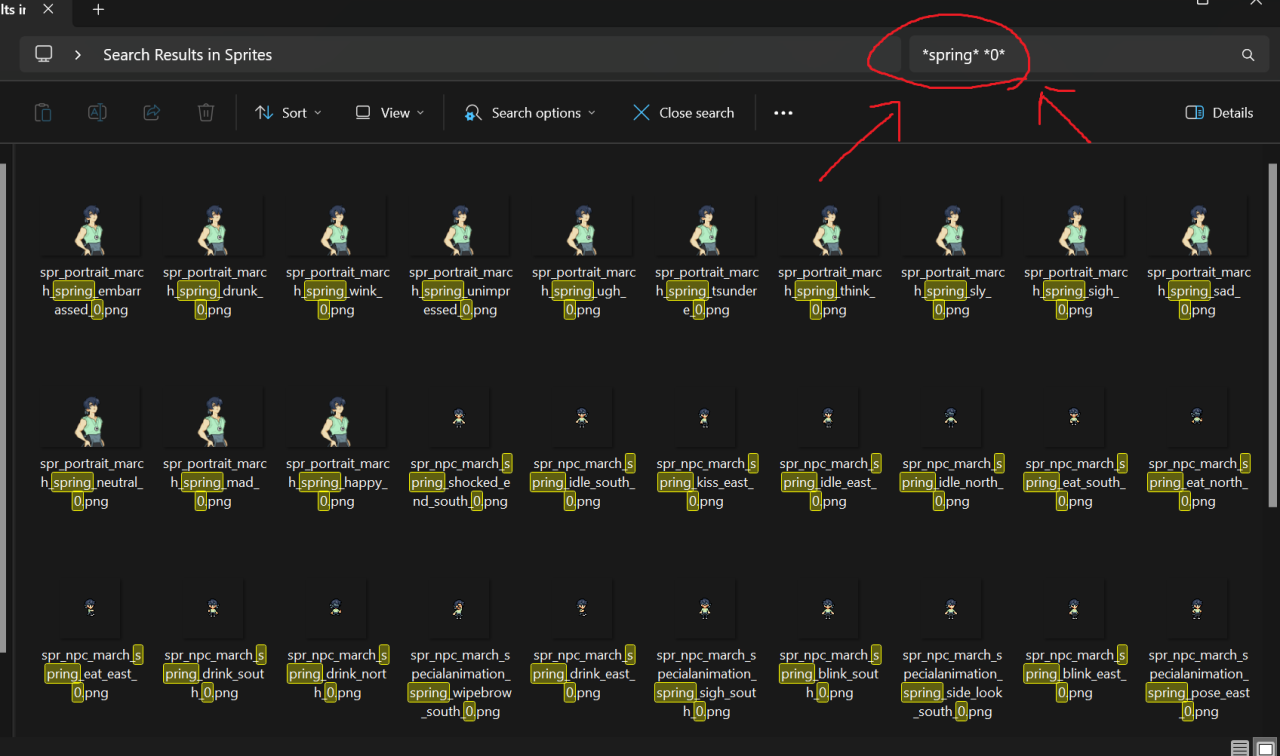
In Aseprite, I specifically open images that start with *0* and may sort images by their seasonal variety, for example, just because you may be editing hundreds of images and want to only start on a small chunk. You want to open images that start with 0 because Aseprite will read this as the first image frame and attempt to open every single image related to it which is what we want for mass editing.
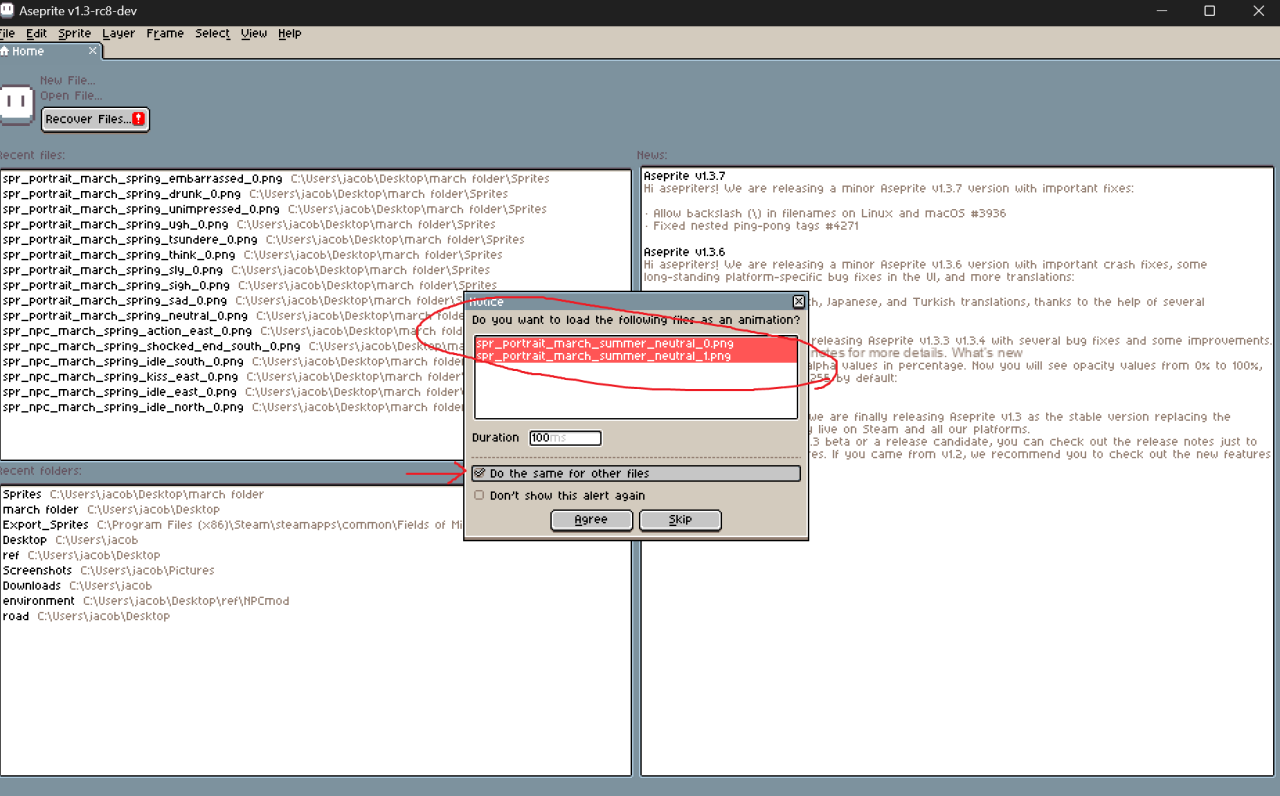
When you first attempt to open all your images in Aseprite (drag them all in,) it will prompt you asking to open all related frames, click the “Do the same for other files” option so you don’t need to hit the prompt over and over then hit “Agree.”
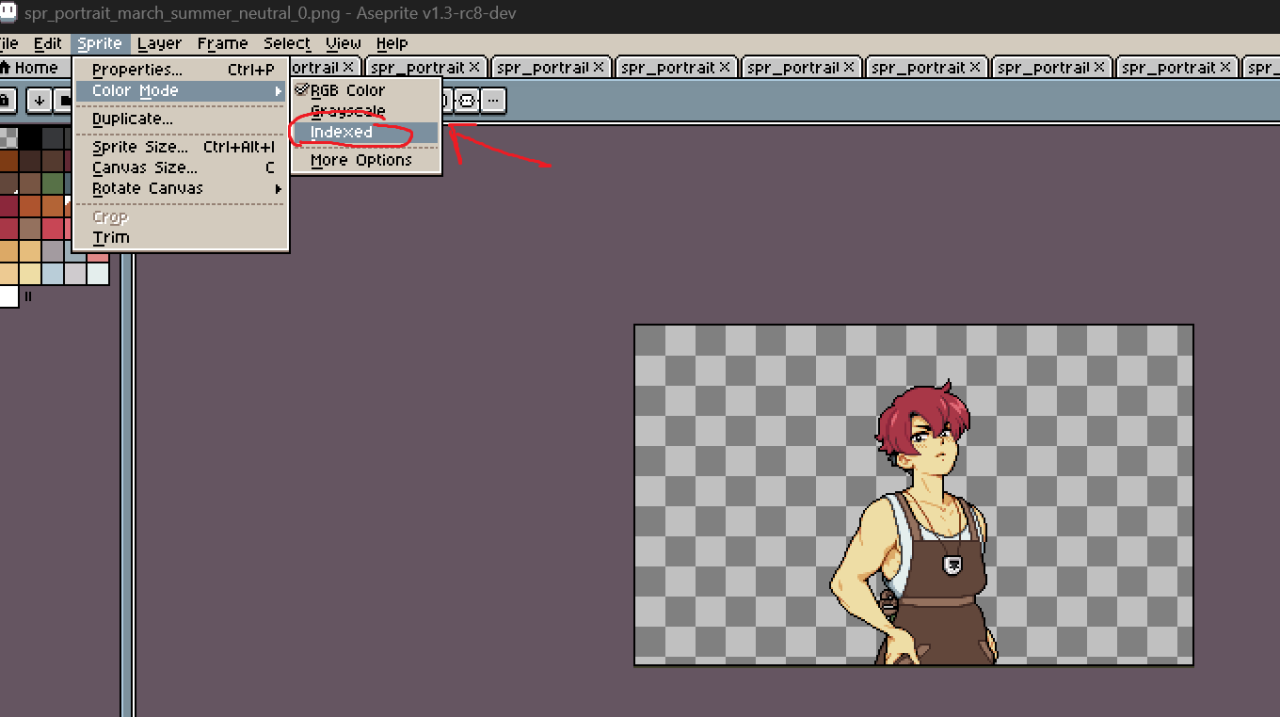
The first step you’ll want to take for quick color changing is changing the color mode for all sprites you are editing. I change my color mode to “Indexed” so that all colors in the color palette are tied to the image and easily changeable. The reason I index the color instead of using the color replacement too (Shift+R) is because you will most likely be changing color on multiple frames and not just one singular image, so it’s a little easier to just index all the colors instead. The color replacement tool will be faster though if you only need to change one singular image with no frames.
While in Aseprite, hit the A button to unlock your color palette, or hover over the little lock icon next to the color palette and hit it. You want it to look “unlocked.”
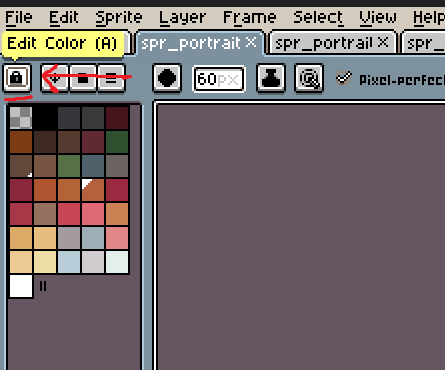
Using the eyedropper tool (shortcut: i,) select the color you want to change on your sprite. I’ll be picking March’s base hair color. Aseprite will show that you have that color selected, then go down to the color selection option and pick the actual color you want.
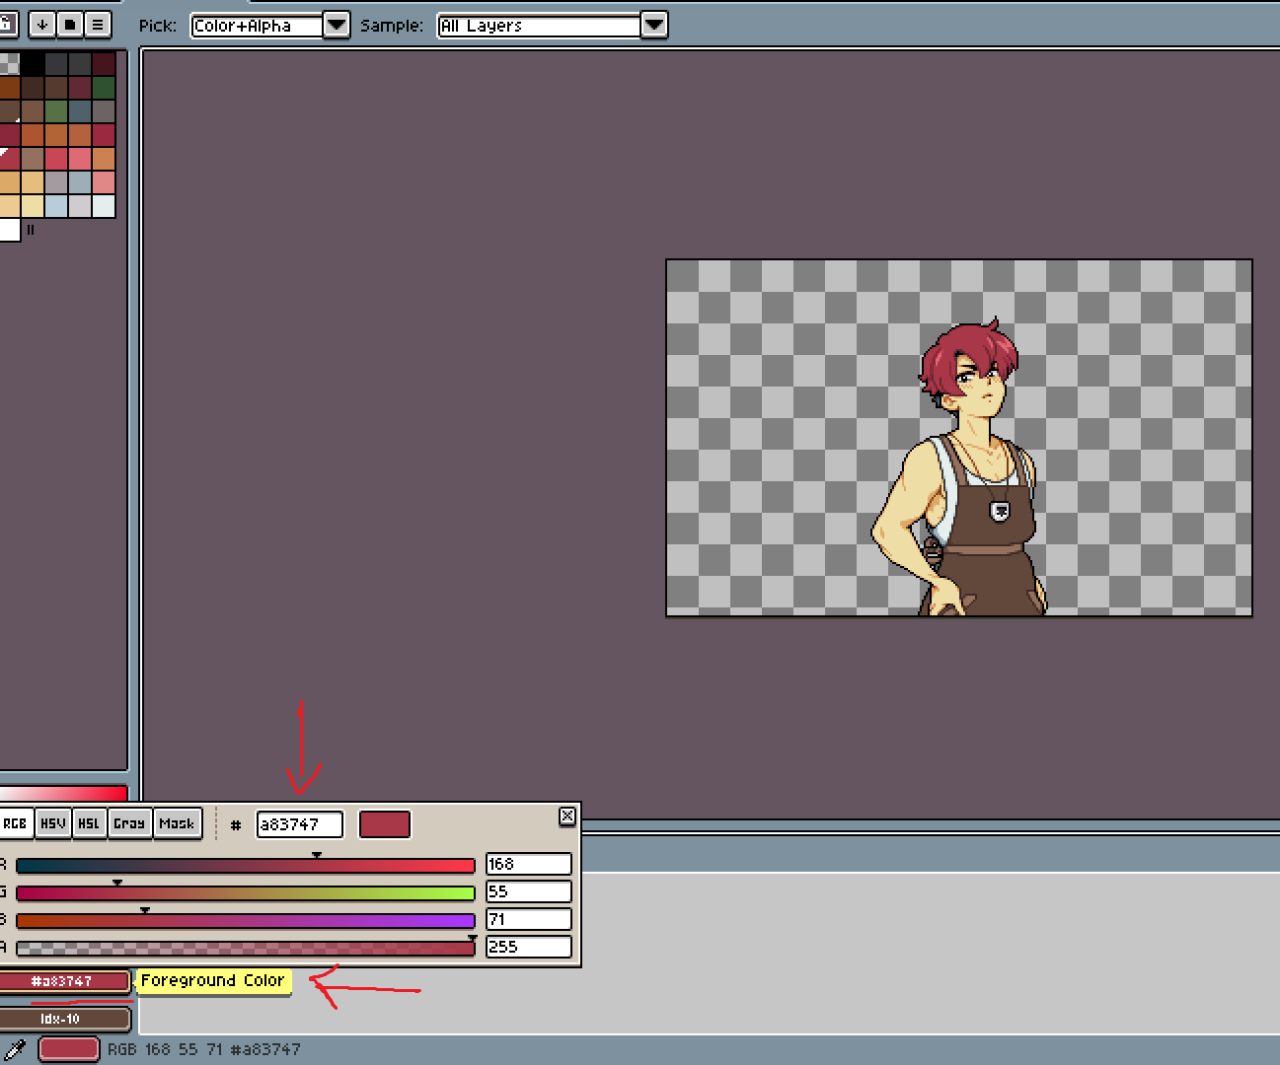
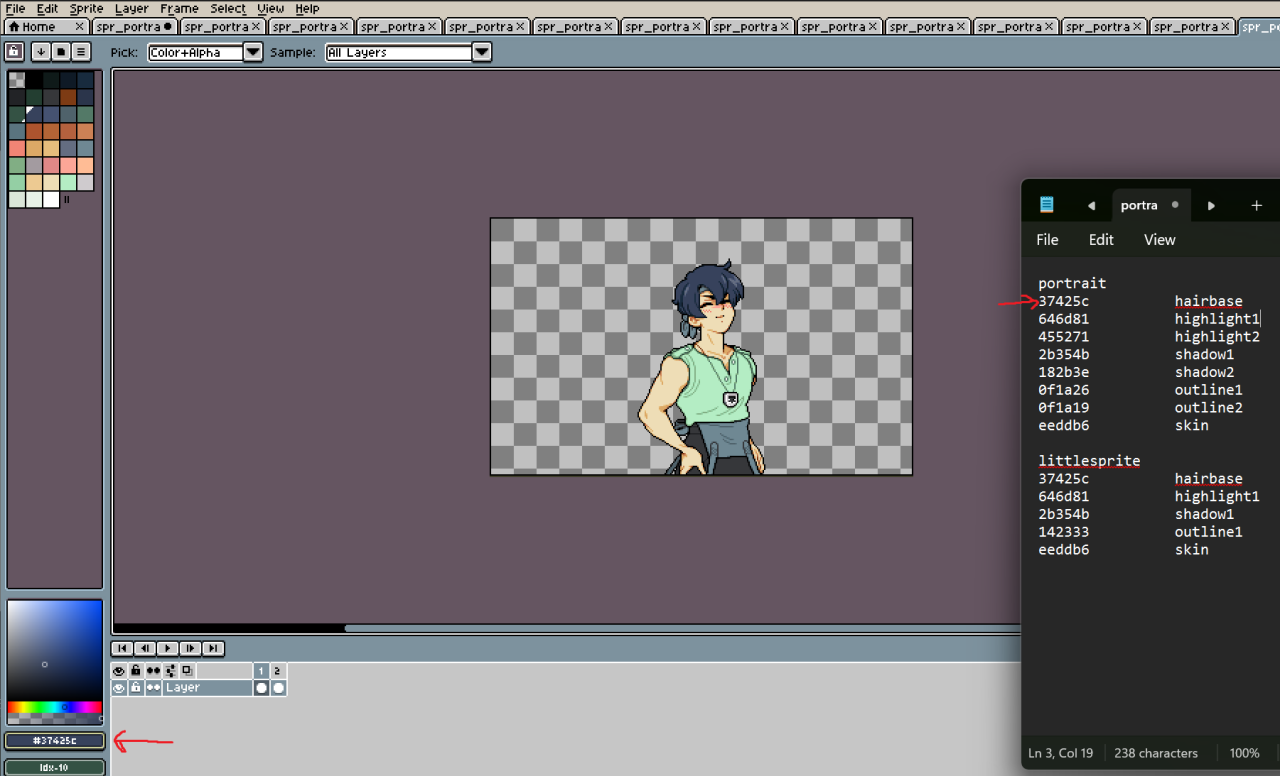
For the sake of quickness, I have all my hex colors ready for pasting in a notepad nearby. I just hastily paste in whatever values are meant for each part of the sprite and then move onto the next sprite. You’ll need to change the color mode on each sprite, and I find it a little faster to paste one hex color at a time and move back and forth between all sprites I’m editing.
Once you finish editing all your sprites, you can change the color mode back if you want although I don’t think it’s necessary and the game can still read the images/sprites fine even though the color mode has been changed.
Importing Modded Sprites 🍀
Now that you’ve hopefully finished editing your sprites, you’re ready to import in the game!
First thing, just reminding you again, make sure you backup your original data.win file just in case you break something and need to go back. Drag a copy of it literally anywhere else on your computer and keep it safe, or just reinstall the game if you forget this step to get back the original file.
You’ll want to hit Scripts > Resource Repackers > ImportGraphics.csx. Wait a moment and you’ll be prompted to browse to a folder, this is when you load your “Sprites” folder where you modified all your images. They’ll be quickly imported!
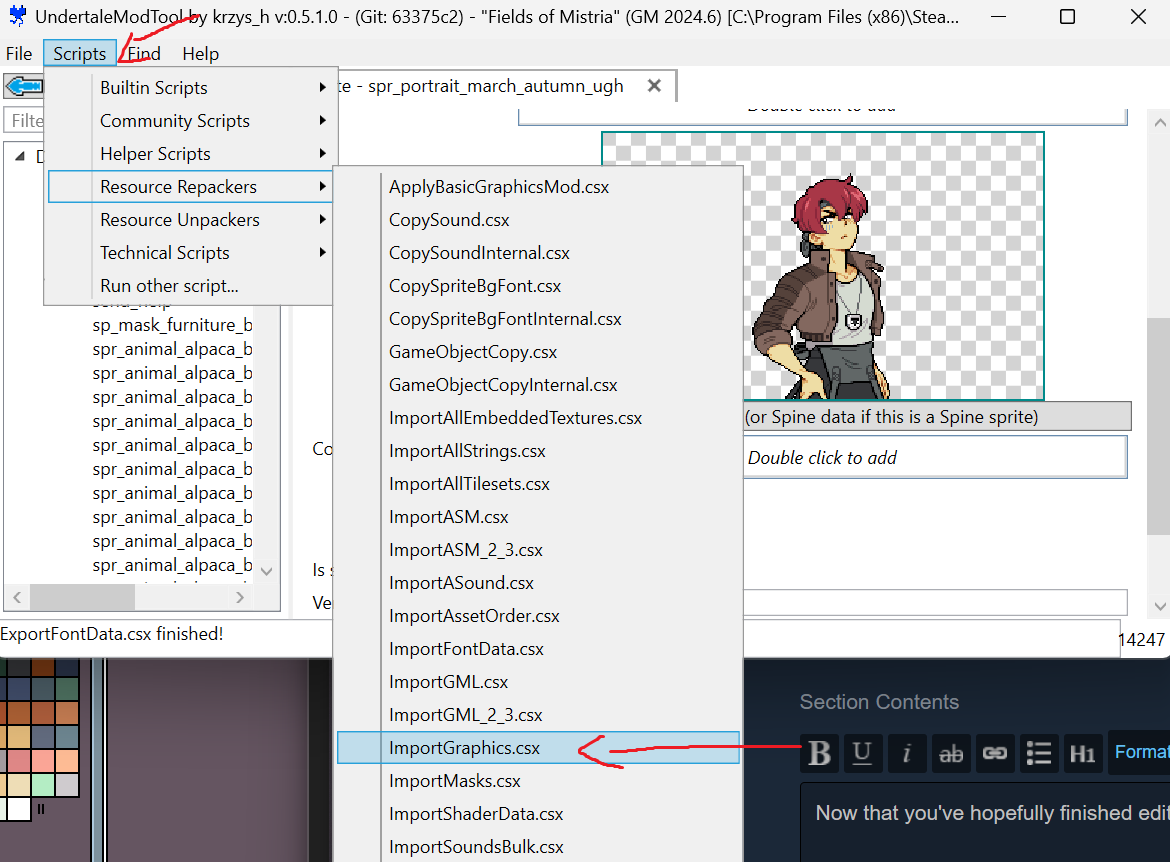
Then you just save your changes (Ctrl+S) or browse to File > Save.
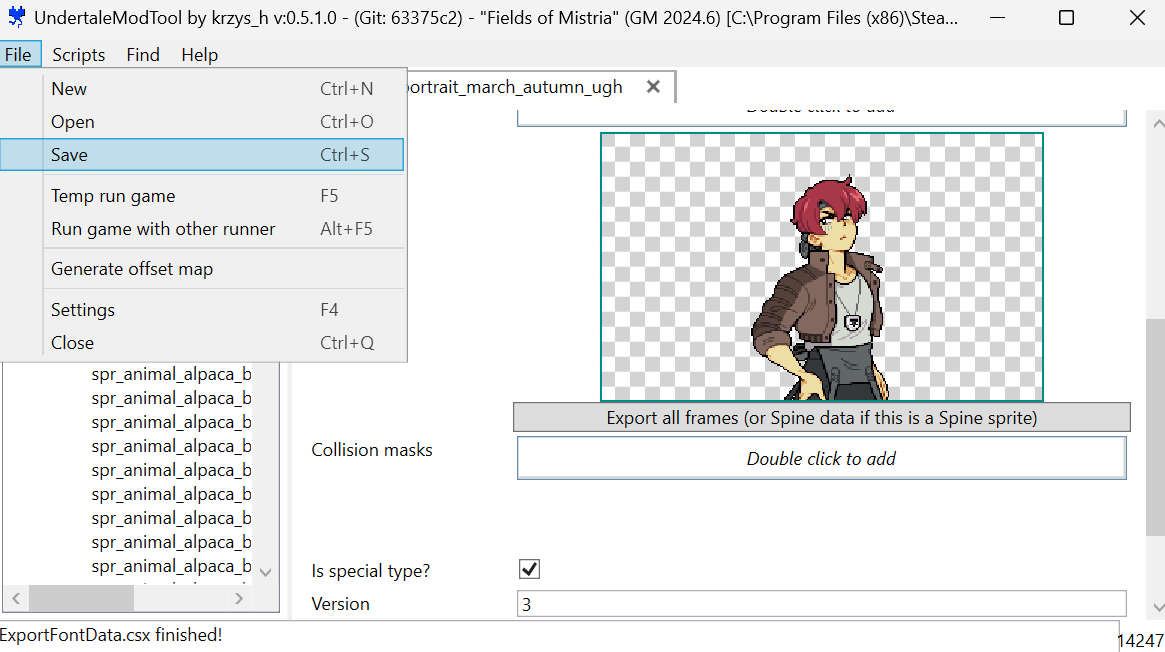
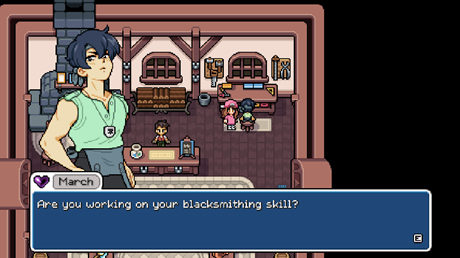
At this point, you’re all done. Go ahead and launch your game and check if your mod is working!
Modding Resources & Tips 🤓
GETTING HELP: There are obviously plenty of other tools available in UndertaleModTool which are not covered by this guide, I would head to places like r/UnderModders on Reddit or just Google how to use other parts of the tool. It’s likely you can ask questions on that subreddit about the tool too, they’re a friendly group of people!
COLOR TIP: Certain sprites use “Lut” files to change the color of the sprite, such as animals or player hair sprites, changing their color may require altering just the “Lut” image (sprite) file attached to it rather than the actual various hair sprites or animal sprites.

REQUESTING MISSING FEATURES: UndertaleModTool does not support fully Fields of Mistria yet, so some aspects of it do not work properly. You may be able to create issues on Github and request missing features for Fields of Mistria, if you want, because UndertaleModTool is still being actively worked on and some features have been fixed just for Fields of Mistria already.
Have fun making mods!
Save Editing Tutorial 📝
This is just a copy and paste of a guide I posted on FearlessRevolution and Reddit a few days ago (so I do have my own permission to repost it!!)
Hit Win+R and paste %localappdata% (which will open your AppData>Local folder,) it’s under the FieldsOfMistria>saves folder in your Local folder. If you have a lot of manual saves like me, I just go for the one that was most recently created under Date modified.
Make sure to backup your player.json file just in case you break something.
You can edit your inventory by searching “inventory” in player.json:
It goes between the brackets [] after members, which is under “inventory” <–search this empty slot:{“members”:[],”required_tags”:[]} or it goes next to the same item in the same slot, such as
{"members":[{"gold_to_gain":null,"inner_item":null,"infusion":null,"cosmetic":null,"animal_cosmetic":null,"item_id":"ITEMIDHERE"},{"gold_to_gain":null,"inner_item":null,"infusion":null,"cosmetic":null,"animal_cosmetic":null,"item_id":"ITEMIDHERE"},{"gold_to_gain":null,"inner_item":null,"infusion":null,"cosmetic":null,"animal_cosmetic":null,"item_id":"ITEMIDHERE"},{"gold_to_gain":null,"inner_item":null,"infusion":null,"cosmetic":null,"animal_cosmetic":null,"item_id":"ITEMIDHERE"},{"gold_to_gain":null,"inner_item":null,"infusion":null,"cosmetic":null,"animal_cosmetic":null,"item_id":"ITEMIDHERE"}],"required_tags":[]}
Default 10 slot inventory example:
I have one worn sword and one vegetable soup in my inventory, the rest are empty slots.
"inventory":[{"members":[{"gold_to_gain":null,"inner_item":null,"infusion":null,"cosmetic":null,"animal_cosmetic":null,"item_id":"sword_worn"}],"required_tags":[]},{"members":[{"gold_to_gain":null,"inner_item":null,"infusion":null,"cosmetic":null,"animal_cosmetic":null,"item_id":"vegetable_soup"}],"required_tags":[]},{"members":[],"required_tags":[]},{"members":[],"required_tags":[]},{"members":[],"required_tags":[]},{"members":[],"required_tags":[]},{"members":[],"required_tags":[]},{"members":[],"required_tags":[]},{"members":[],"required_tags":[]},{"members":[],"required_tags":[]}],
Edited stacked inventory example:
I have one worn sword and 8 vegetable soup in my inventory, I also added in an orange sapling to an empty slot.
"inventory":[{"members":[{"gold_to_gain":null,"inner_item":null,"infusion":null,"cosmetic":null,"animal_cosmetic":null,"item_id":"sword_worn"}],"required_tags":[]},{"members":[{"gold_to_gain":null,"inner_item":null,"infusion":null,"cosmetic":null,"animal_cosmetic":null,"item_id":"vegetable_soup"}],{"gold_to_gain":null,"inner_item":null,"infusion":null,"cosmetic":null,"animal_cosmetic":null,"item_id":"vegetable_soup"},{"gold_to_gain":null,"inner_item":null,"infusion":null,"cosmetic":null,"animal_cosmetic":null,"item_id":"vegetable_soup"},{"gold_to_gain":null,"inner_item":null,"infusion":null,"cosmetic":null,"animal_cosmetic":null,"item_id":"vegetable_soup"},{"gold_to_gain":null,"inner_item":null,"infusion":null,"cosmetic":null,"animal_cosmetic":null,"item_id":"vegetable_soup"},{"gold_to_gain":null,"inner_item":null,"infusion":null,"cosmetic":null,"animal_cosmetic":null,"item_id":"vegetable_soup"},{"gold_to_gain":null,"inner_item":null,"infusion":null,"cosmetic":null,"animal_cosmetic":null,"item_id":"vegetable_soup"},{"gold_to_gain":null,"inner_item":null,"infusion":null,"cosmetic":null,"animal_cosmetic":null,"item_id":"vegetable_soup"},{"gold_to_gain":null,"inner_item":null,"infusion":null,"cosmetic":null,"animal_cosmetic":null,"item_id":"vegetable_soup"},{"gold_to_gain":null,"inner_item":null,"infusion":null,"cosmetic":null,"animal_cosmetic":null,"item_id":"vegetable_soup"},{"gold_to_gain":null,"inner_item":null,"infusion":null,"cosmetic":null,"animal_cosmetic":null,"item_id":"vegetable_soup"}],"required_tags":[]},{"members":[{"gold_to_gain":null,"inner_item":null,"infusion":null,"cosmetic":null,"animal_cosmetic":null,"item_id":"sapling_orange"}],"required_tags":[]},{"members":[],"required_tags":[]},{"members":[],"required_tags":[]},{"members":[],"required_tags":[]},{"members":[],"required_tags":[]},{"members":[],"required_tags":[]},{"members":[],"required_tags":[]},{"members":[],"required_tags":[]}],
I believe chest inventories may be location in playerhome.json or farm.json depending on where the chest is, and the items are under “inventories” rather than inventory.
Editing gold, essence, mana, buffs, etc.:
If you’re doing the Spring Festival event, you can just spam the flowers into your inventory and win easily. The game apparently does count cheated flowers as real ones.
If you want to edit gold, it’s under “gold” (search that with the quotes around it) in your player.json.
You can also edit your essence which is nearby if you want skill points. Search “essence” (with quotes again.)
Mana is likely under “mana_current” and one fully charged mana is 4.0, keep that in mind if you want to quickly refresh all your mana without sleeping.
If you want infinite stamina, I recommend spamming a powerful food dish into your inventory and just carrying a ton around.
Tip from plumprumps on FearlessRevolution on buffs:
Go to clinic and buy all the buffs you want, use them, then go into player.json under your save and adjust your status (finish time 9999999 has worked for 2 in-game days for me):
"status_effects":[null,{"amount":1.5000000000000001,"finish":9999999,"start":120120,"last_update":120120,"type":"speedy"},null,null,null,null,null,null]
Make sure you back up your save file before editing because inventory can be touchy with some items that are not meant to stack. It’s much safer to edit items that stack naturally. I would also avoid adding items that you think might be important for a story quest, having them ahead of time may break your save.
Have fun save editing!

